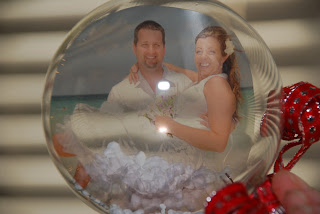
Last year a good friend of mine, (Helen) showed me an ornament that a family member had made and gifted to different members of her family. This year I gave it a try and loved the outcome. It was so easy and inexpensive I figured I would share in case anyone wants to give it a try next year (sorry I am just getting around to it but December is such a busy month!). Total cost was less than $1 an ornament.
First I purchased clear bulbs (50% off at Hobby Lobby for course).
Then I made a pdf with different size round photos. I had to guess on the size that would fit in the different size ornaments I purchased. You can practice but printing on regular paper and cutting and inserting into the glass ornament (use tweezers if you get it stuck).
After that I had the pdf's printed at Office Max on transparency paper. This is a clear paper that usually people use on a projector that displays on the screen when light shines through it. I could get about 6 circle photos on one 8.5x11 sheet and it cost me $0.70 for black and white or $1.40 or so for color. Much better in my opinion than buying the pack of 50 sheets for $50 only to print out home using my ink.. My gosh, that would be 300 ornaments worth and a lot of ink!
When you pick them up after they are printed there is white paper behind them. This makes it easy to see that they printed correctly and in my opinion easier to cut into circles.
After you cut them out you roll them up and insert them into the glass ornaments, they just pop open. You only need one per ornament. Note if you cut too small they will rotate in your ornament, this could be a good thing or a bothersome thing.
Then comes the fun part where you get to tie ribbon on them or put fake snow inside them. Next year I might try some colorful beads at the bottom. This year I just used glitter on a few and fake snow on the rest.
As you can see, when the light shine through the photo is visible from both directions.
Good luck!


