Showing posts with label Crafts. Show all posts

Sunday, January 16, 2011

Antique Ice Skates

Last weekend I purchased some really old ice skates that were dirty inside and out. I cleaned them up to hang outside our front door. I am going to paint something on them, possibly our family name.

I figured I better get them out there while we have snow on the ground. I hope to have time to paint them sometime this week but at my current blogging rate you may not see them again until the snow melts (sorry!).

Tuesday, December 28, 2010

Photo Ornaments for less than $1.00 each

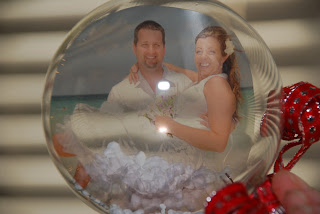
Last year a good friend of mine, (Helen) showed me an ornament that a family member had made and gifted to different members of her family. This year I gave it a try and loved the outcome. It was so easy and inexpensive I figured I would share in case anyone wants to give it a try next year (sorry I am just getting around to it but December is such a busy month!). Total cost was less than $1 an ornament.

First I purchased clear bulbs (50% off at Hobby Lobby for course).

Then I made a pdf with different size round photos. I had to guess on the size that would fit in the different size ornaments I purchased. You can practice but printing on regular paper and cutting and inserting into the glass ornament (use tweezers if you get it stuck).

After that I had the pdf's printed at Office Max on transparency paper. This is a clear paper that usually people use on a projector that displays on the screen when light shines through it. I could get about 6 circle photos on one 8.5x11 sheet and it cost me $0.70 for black and white or $1.40 or so for color. Much better in my opinion than buying the pack of 50 sheets for $50 only to print out home using my ink.. My gosh, that would be 300 ornaments worth and a lot of ink!

When you pick them up after they are printed there is white paper behind them. This makes it easy to see that they printed correctly and in my opinion easier to cut into circles.

After you cut them out you roll them up and insert them into the glass ornaments, they just pop open. You only need one per ornament. Note if you cut too small they will rotate in your ornament, this could be a good thing or a bothersome thing. 

Then comes the fun part where you get to tie ribbon on them or put fake snow inside them. Next year I might try some colorful beads at the bottom. This year I just used glitter on a few and fake snow on the rest.

As you can see, when the light shine through the photo is visible from both directions.

Good luck!

Saturday, December 4, 2010

Our 2010 Christmas Card

I've been thinking really hard for months now about what to do for our Christmas card. I really liked how last year's turned out and I'm running out of time to get this years done and mailed.

Here is 2009 card (children names omitted)...
 Today I finally decided what to do for our card! I think it may even top last years. ;) Stay tuned...

Sunday, September 12, 2010

Homemade Serving Stand- Total cost $.98


I made a cute little homemade serving stand the other day for a total cost of $.98

First I purchased this blue dish for $.49 at a resale store...
And at the same store, during the same trip, I also purchased a white plate for another $.49. I had some left over red spray paint from recent project (that I will be sharing soon) so I used that and sprayed the blue dish red.  I just wanted something red to use this fall and winter, I had nothing against the blue.


Next I simply placed the white plate on top. It fit in a way that it wouldn't slip. I did not attach the two so I could take it apart for easy storage.


 Linking to Metamorphosis Monday.

Monday, June 28, 2010

Garden themed Bridal shower a success

My balloon lady/ friend taught me how to make these balloon flowers. Aren't they just adorable? They take about 5 minutes each to do but they were very fitting for a garden themed bridal shower.
 
I put some on the front porch right before the guests arrived. I also decorated with fresh flowers throughout the house (just didn't seem to get pictures of them).


I used my friend's chocolate fountain again, I think at this point I have used it more than she has! I just love the thing, probably because I like chocolate so much.


We played a few games including splitting up into groups and designing wedding dresses out of paper towels, toliet paper and tape with a 10 minute time limit. This is what our brides looked like. Trashy eh?


Another fun thing that we did was wrote down phrases the bride said while she was opening her presents without her knowing and after she was all done we passed around the list and each person read one of her phrases after saying.. "This is what Nida will say on her wedding night..." It was VERY funny taking what she said out of context. Here is the soon to be bride listening and highly embarrassed. ;)


Check out what I put my gift in. I found this at Home Goods  and it's made out of recycled magazines. My friend (the soon to be bride) is big into making things out of other things so I thought she would like this. It even had the little chalk board tag already on it.


To drink I served lemonade, fruit punch, bottled water and June Bugs (recipe here).

To eat I served crackers and cheese, fresh veggies with ranch dipping sauce, the chocolate fountain with lots of dipping items including fresh fruit and for her cake I made Banana Split Cake, which was perfect for a steamy hot day! Unfortunately I forgot to take a picture before it was half way eaten, sorry!


Here is the recipe if you want to give it a try...

Banana Split Cake
serves 15

Ingredients:
2 cups crushed graham crackers
1 stick margarine
2-8 oz. pkgs of cream cheese (softened)
1- 1lb box powdered sugar
1 tsp vanilla
5 bananas
1- 20oz crushed pineapple
8oz cool whip
optional 1 cups chopped pecans for topping
optional 1 small far mar cherries for topping

Instructions: Combine melted margarine and graham cracker crumbs. Press into bottom of 9x13 pan/ dish. Combine softened cream cheese, powered sugar and vanilla. Blend until smooth; spread over crust. Slice bananas over cream cheese mixture, then spoon pineapple over bananas. Spread Cool Whip over all and top with pecans and halved cherries if desired. Refrigerate overnight before serving.

Wednesday, June 9, 2010

One Million Pillowcase Challenge- Join me?

Remember this material I bought back in February without a purpose?

It now has a purpose! I am going to be part of the "One Million Pillowcase Challenge". Basically you make pillowcases and donate them to local charities. Who doesn't want to sleep on a clean new pillow case of their own? I think I will donate the ones I make to a womens shelter.

Some of the donation suggestions for the challenge include:
•Operation Support for Deployed Military
•Department of Human Services
•Child Welfare Services
•Nursing homes
•Oncology units
•Women’s shelters
•Youth shelters
•Runaway shelters
•Hospice centers
•YMCA’s
•YWCA’s
•Red Cross
•United Way
•Ronald McDonald House
•Veteran’s clinics/hospitals
•Missions
•Transitional Residences
•Victims of fires
•Victims of hurricanes
•Victims of floods
•Church World Service
•Lutheran Refugee Services
•Catholic Charities
•Pediatric Surgery Centers of local hospitals

Check out this girl who is going to hand out these 47 pillowcases at her upcoming 1 month hospital stay...


Or these ladies who made 64 pillowcases to donate to a nursing home...


Care to join me? Read all about the challenge here:   http://allpeoplequilt.com/millionpillowcases 
There are even free fun patterns on their website.

Wednesday, May 12, 2010

Completed Barefoot Sandals & Wednesday Gratitude

Oh, how I am already missing relaxing in Jamaica! I couldn't be more thankful that we have the means to travel like we do. This hammock was outside our room on our veranda at the resort, I'm really wishing I had one at home! It was just perfect for the two of us.
We would wake up and have breakfast delivered to our veranda. So peaceful and everything just tastes better when you have all the time in the world to enjoy it.

I promised I would take pics of the completed barefoot sandals I made for our Jamaica trip.
So here they are. Very easy to make and fun to wear!

Tuesday, March 2, 2010

Barefoot Sandals

This past weekend I finally had an opportunity to start some barefoot sandals. They are turning out pretty cute. You'll have to wait to see them on my actual feet until I get my first spring pedicure!

Tuesday, February 16, 2010

Feeling under the weather...

My seed catalogs are starting to arrive! And it's a good thing, because I am really not feeling good. I've been in bed all evening reading and they have been a pleasure flipping through.
Today I bought some fun new fabric. I am not sure what I'm going to make yet, but it's sure to come to me. Right? Right?!
I've also been looking through some of my beads, planning my barefoot sandals. I know I was planning to make them last weekend but I just wasn't feeling up to it, so the plan is to make them this coming weekend.
Oh, how I hope to be feeling better tomorrow!

Tuesday, February 9, 2010

Barefoot Sandals- MUST HAVE!

I am intriqued with 'barefoot sandals'.


I cannot believe I am in my 30s and have never seen barefoot sandals. My guess, is that it has something to do with Kansas being so far from the beach. Now that I've seen them, I HAVE to have some for my trip to Jamaica in April (who needs shoes!) And this weekend I plan to make a couple pairs, any friends are welcome to join me.

Saturday, January 30, 2010

Today we made Valentine's Day cards

Today I had a great time with one of my best friends and my soon to be mother-in-law making Valentine's Day cards. It reminded us all of being in grade school again.

My table looked like this...


Basically you could do and make anything your imagination let you. We had ribbons, buttons, stickers, papers, etc, etc. etc.


Below are a handful of the ones I made.


This one I used a vintage card on.

Sunday, January 24, 2010

New Project Awaiting- antique dresser refinishing

Yesterday, my soon to be mother-in-law gifted us her grandmothers old dresser that has been collecting dust in her basement. That makes it my fiance's great grandmother's dresser. It certainly has a weathered look to it, but I can still see the beauty. It's very sturdy and I plan to put it to good use after I refinish it. I'm thinking it will work great for my 15 year old son's room. Of course I wouldn't dare tell him until I transform it!

Here are the before pictures and hopefully in no time at all I will have some after photos!

Sunday, January 10, 2010

Fun Project with GREAT friends!

This weekend I had a great time with two of my best friends. One was here visiting for the weekend and we wanted something creative to do with our time... Sooo, we decided to make us some fancy fun house aprons. We went and purchased some funky material and just designed them as we went.  We had a great time visiting as we sewed and are all very happy with the end result! Thanks to my dear honey for tolerating the laughter and agreeing that our funky aprons turned out quite cute (although I know he must have had some doubts along the way!)